Asterisk Queues Tutorial
This tutorial covers the basics of setting up Asterisk (TM), the popular Open Source PBX system from Digium, to provide call center queue functionality. It's designed to be of wide appeal to all Asterisk users - so only the last section is specific to OrderlyQ.
Once you've set up your queues and started taking calls, you should also take a look at OrderlyQ, which is an add-on for standard Asterisk queues that allows your Callers to hang up and call back later without losing their place in the queue, resulting in substantial increases in Caller satisfaction and retention, and substantial savings for Call Center operators. There is a FREE TRIAL of OrderlyQ now available for Asterisk users - please contact us for further details, or Try It Now by calling +44 333 5432 101.
The best place for further information about Asterisk and VoIP in general is voip-info.org.
New: Try our new FREE statistics package for Asterisk, OrderlyStats.
First, you have a decision to make.
To route calls to your agents, you add the agents to a Queue, and then send your callers into the queue for distribution. Asterisk has three different methods for adding agents to your queue, and you need to choose which you are going to try first before proceeding. These are:
-
Phones
The simplest Asterisk queue set up is where you add your phones directly to the queue. This is ideal if each agent has his/her own desk, with their own dedicated phone that no-one else uses. You will need OrderlyStats to do Hot-Desking if you are using the Phones method of call distribution.
-
Extensions (Hot Desking)
Also known as Local Channels. In this model, Asterisk calls extensions in your dialplan, which are then routed to your agent's phones. This allows your agents to log in and out of different phones, so is ideal if two agents need to share the same phone, or if your agents move desks (hotdesking). This allows for the most versatile call center. OrderlyStats can also make Hot-Desking easier when used with Local Channels.
-
Agent Channels
Agent Channels provide similar hotdesking functionality as Extensions above, and are simpler to set up, but have been deprecated and are not supported in Asterisk versions 1.6.2 and above, so will not be discussed further here.
We've produced different versions of this tutorial to cover the different ways of setting up Asterisk queues. This version is the Phones version. You can switch to the Extensions method by clicking on the link above.
Not sure which method is right for you?
Though it's possible to use all three methods for different agents in the same queue, most call centers pick one method and stick with it.
- If you're new to Asterisk, or just want things to be easy and simple, start with the Phones method (described in full below). You can always move to a different distribution system later if you need to, and OrderlyStats can help you with simple hot-desking. If you need more complex Hot-desking, we recommend the Extensions method as this allows for a more versatile call center.
- If you need more complex Hot-desking, we recommend the Extensions method as this allows for a more versatile call center.
Phones Tutorial Contents:
If you're having any trouble setting up Asterisk queues, then please do ask us - even if you're not an OrderlyQ customer, we're always happy to help.
Install Asterisk and other dependencies
There are a number of things you'll need to get set up
Asterisk
-
If you're starting from scratch, you might try an all-in-one distribution of Asterisk like FreePBX. These include a precomplied Asterisk as well as an operating system for your hardware.
-
It's more likely that you are installing Asterisk on an existing system. Though there may be pre-compiled Asterisk packages available, we find it's best to compile Asterisk from source, as this tends to give the best performance in our experience. First of all, you'll need a computer running Linux. We run Debian, but any Linux will do.
-
Next you'll need to get Asterisk. We recommend you download the latest certified release. This tutorial is tested on 1.2.x, 1.4.x, 1.6.x, 1.8.x, 11.x and 13.x. You probably only need the basic Asterisk package, but the Addons and Sounds packages are also common choices.
Asterisk has a few prerequisites of its own and is usually compiled from source (instructions), so if you don't have them, you might run into trouble during the compilation. If you're running Debian, you can get the prerequisites automatically by installing the build dependencies for the Debian Asterisk package:
apt-get build-dep asterisk
This will get you all the build dependencies and should prevent any compilation issues when you compile from source.
Hint: If you see timing errors or warnings while compiling or running Asterisk, you need to synchronize your clock. Debian users can do this easily with > apt-get install ntpdate
OrderlyStats
-
OrderlyStats will show you what's going on as you set up your queues and route the calls through to the Agents. You'll also need OrderlyStats to follow the screen shots in the tutorial, and perform one-click Agent log in and log out. You can either download and install it yourself, or sign up for the Managed Service.
Note:You can complete this tutorial without using OrderlyStats - but the resulting system will not be as good.
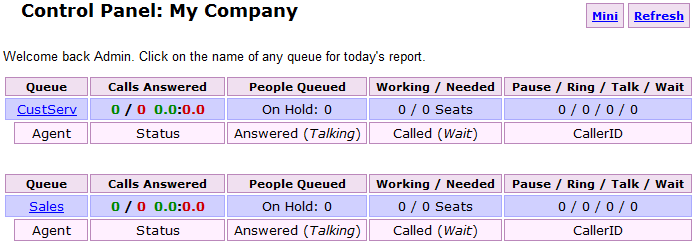
Once you've finished the installation/sign-up process and connected to your Asterisk, please log in and go to the Control Panel, which should look like this:

Note: If you already have queues and Agents set up on your Asterisk, these will be detected automatically when OrderlyStats connects to it for the first time.
Note: OrderlyStats will work with any Asterisk queue configuration, including Elastix, AsteriskNOW, TrixBox and FreePBX - you don't have to follow the set-up described in this tutorial to use OrderlyStats.
sox
This is optional - you will need it if you wish to use your own prompts to play to callers while they are in the queue. Asterisk does come with its own set of default prompts you can use for this purpse, so you can skip this section.
-
Sox is a utility for converting between different types of WAV files (a sound format). If you're using Debian, you can get it with.
> apt-get install sox
If you're using other flavours of Linux, you may be able to find a pre-built package, otherwise you can download and compile the source code.
Sox is very useful; for instance you can have Asterisk play your own messages and instructions to Callers by recording spoken messages in standard WAV file format, then converting them to GSM format with the following command:
> sox inputfile.wav -r 8000 -c 1 outputfile.gsm
or this to convert all the files in a directory:
> for i in *.wav; do sox $i -r 8000 -c 1 $(basename $i .wav).gsm; done
If you're interested in creating your own telephony applications then you might also take a look at OrderlyCalls. In this tutorial we'll be using Sox to help us with Music On Hold.
Lame
This is also optional - you will need it if you wish to play your own music on hold (that you have in MP3 format) that people will listen to while they are in your queue. Asterisk does come with its own set of music on hold you can use for this purpse, so you can skip this section.
-
Typically music on hold is provided through MP3 files, which is one of the few formats not supported by Sox. Lame is an MP3 encoder/decoder which we can use for conversion.
There's no Debian package, so here are the instructions for compiling from source. First, download the source code bundle. Next extract it:
                            > cd /usr/src
                            > tar -xvzf /path/to/lame-3.96.1.tar.gz
To compile and install from source:
                            > cd /usr/src/lame-3.96.1
                            > ./configure
                            > make
                            > make install
If your installation is successful, then typing lame at the command line should print out usage information. That's it for the prerequisites.
Install Phones
Once you've got Asterisk, you'll need at least two phones in order to test your phone system. In this tutorial we're going to use three - but don't worry - instead of buying hardware phones, we're going to use free SIP software phones instead, running on another computer on the local network.
We use SJPhone from SJLabs (installation instructions), and X-Lite from CounterPath (installation instructions), and Express Talk from NCH (installation instructions), all running on the same Windows PC. You can use the FREE versions of all these phones to complete the tutorial. We also use MicroSIP and Vop Nano if we need even more phones.
For this tutorial, name your ExpressTalk phone '1001', your X-Lite '1002', and your SJPhone '1003'. Edit your /etc/asterisk/sip.conf file and at the end add the following lines:
                                [1001]
                                ;ExpressTalk
                                context=main
                                type=friend
                                Callerid="1001"
                                username=1001
                                secret=1001
                                host=dynamic
                                dtmfmode=RFC2833
                                disallow=all
                                allow=alaw

                                [1002]
                                ;XLite
                                context=main
                                type=friend
                                username=1002
                                Callerid="1002"
                                secret=1002
                                host=dynamic
                                dtmfmode=RFC2833
                                disallow=all
                                allow=alaw

                                [1003]
                                ;SJPhone
                                context=main
                                type=friend
                                Callerid="1003"
                                username=1003
                                secret=1003
                                host=dynamic
                                dtmfmode=RFC2833
                                disallow=all
                                allow=alaw
If you are using your own sip.conf entries, you must make sure the Callerid and context are set as above to be able to follow the examples in this tutorial.
Hint: If you want to hear Music On Hold with X-Lite, make sure Menu->Advanced System Settings->Audio Settings->Silence Settings->Transmit Silence is set to Yes.
Note: We couldn't get DTMF (keypress) tones from the current version of SJPhone to work at all, so we'll use this as the Caller's phone for the rest of the tutorial. We'll use Express Talk (1001) as the first Agent phone, and X-Lite (1002) as the second.
Add Phones to OrderlyStats
In order for OrderlyStats to start tracking calls to and from your Phones, you need to add the Phones to OrderlyStats. To do this, go to the Agents page (in the menu on the left hand side of the Control Panel) and hit Add Interface at the bottom of the page, and enter in SIP/100X (where X is 1 and then 2 - don't add the third one as this is being used to represent the Callers) for each of the two agent Phones like this:
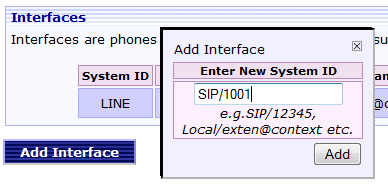
Adding the first Agent Phone...
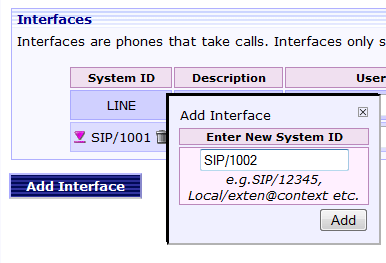
Adding the second Agent Phone...
Agent Details
You should also fill in the rest of the details for each Agent, and hit Save Changes at the bottom of the page to save before adding the next Agent:
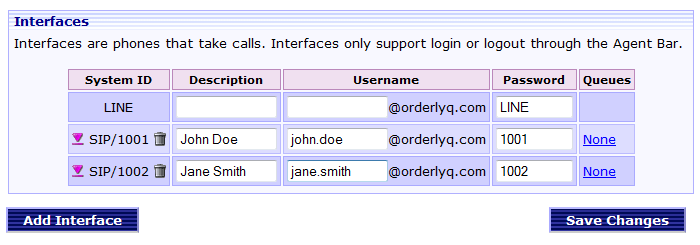
Entering the agent details...
The username and password fields are for the Agent Toolbar - more about this later.
Note: The LINE Agent is automatically created by the system, and is used to indicate that a call has been answered, but not by an Agent.
Create Phone Extensions
Next, we need to create extensions for your phones, so that Asterisk can dial them.
WARNING If you are running asterisk 1.6.x or above you should first bypass the default AEL dialplan, otherwise your extensions.conf file will be ignored. You can do this by running the following commands as root:
                                > mv /etc/asterisk/extensions.ael /etc/asterisk/extensions.ael.save
                                > asterisk -rx "core restart now"
Note: You must restart asterisk for this change to take effect.
Now add the following to the end of your /etc/asterisk/extensions.conf file:
                                [main]
                                ;Phone Extensions
                                exten => _1XXX,1,NoOp(Dialling phone ${EXTEN})
                                exten => _1XXX,n,Dial(SIP/${EXTEN},,rotwh)
                                exten => _1XXX,n,Hangup
Next do an Asterisk reload by typing module reload (or just reload for Asterisk 1.4 or below) at the Asterisk command line (which you can reach by typing asterisk -vvvr).
Here we have created a new context for your phone calls, called main. Calls made from your phones will arrive in the context specified in each phone's sip.conf entry (which we have already set to main).
We've also defined a pattern-matching extension, which will match any four digit number 1000 to 1999. The extension dials the corresponding SIP phone.
Test Calls
Let's make some calls! To recap, we have set up agent John Doe using phone 1001 (ExpressTalk), and agent Jane Smith using phone 1002 (X-Lite). We're using SJ-Phone to represent your callers.
So, let's use SJPhone to call John Doe, by dialling 1001. You'll see the call come up as an INBOUND call to John Doe in the OrderlyStats Control Panel:

John's phone Ringing with the inbound call from SJPhone / 1003.

After answer, John is shown as Talking to Caller 1003.
Now we're going to test the second Agent, Jane Smith (1002), using X-Lite.
To test Jane's phone, dial 1002 from John's phone (ExpressTalk). As this is an internal call, each leg of the call will be shown separately in the Control Panel, as an INBOUND call to Jane, and an OUTBOUND call from John:
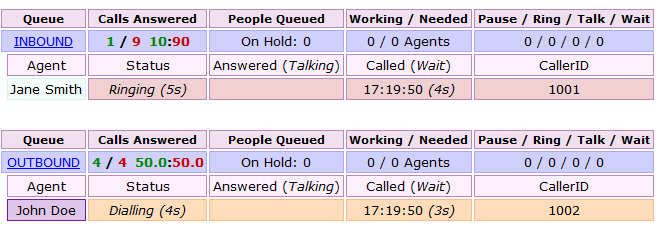
John (1001) makes an internal call to Jane (1002).
The call is only shown once in the OrderlyStats reports (historical logs), as an INTERNAL call:

John misses an inbound call, makes an outbound call, calls Jane but she doesn't answer, and then calls Jane and she does answer.
Calls are shown with the most recent at the top of the page (but you can change the sort order using the arrows at the top of each column).
Configure Music On Hold
When callers call Asterisk, you can play them music. Although Asterisk can play MP3 files, this is very inefficient as the file must be continually decompressed by the processor as it is played for each caller.
It is better to use wav or alaw files, as these place less load on the system when played.
You can play a single file or groups of files; in the latter case Asterisk will play each file in order, then repeat (assuming your caller is still on hold by that point).
-
To specify groups of files, you put them in the same directory.
-
To play a single file you create a directory and put the single file in it.
You can also specify multiple different groups of files to play under different circumstances.
The default group of music on hold files is in
/var/lib/asterisk/moh
This directory contains three sound files in wav format.
To tell Asterisk about your groups of files, you list them as classes in /etc/asterisk/musiconhold.conf, which initially has just one class defined called 'default':
                                        ;
                                        ; Music on Hold -- Sample Configuration
                                        ;

                                        [default]
                                        mode=files
                                        directory=/var/lib/asterisk/moh
To begin with, all the other classes are commented out.
Test Default Configuration
We'll start by testing the default configuration. Add the following lines to /etc/asterisk/extensions.conf, inside a context you can reach with your phones.
                                        exten => 2000,1,Answer
                                        exten => 2000,2,SetMusicOnHold(default)
                                        exten => 2000,3,WaitMusicOnHold(20)
                                        exten => 2000,4,Hangup
Next do an Asterisk reload to tell Asterisk about the new extension.
> asterisk -r
CLI> reload
Now dial extension 2000 with your phone. You should hear the default music.
Note: If you hang up and call back, the music starts where it left off, not at the beginning. This is an efficiency measure in Asterisk, as it's much less computationally expensive to produce one music stream shared between all callers, rather than a separate stream for each new call.
Play Your Own Music
You'll probably want to change the music played to suit your own tastes, so find an MP3 of some music you'd like to play to your callers. A good source of free classical MP3s is classiccat.net.
Before you play them, you'll need to convert the file format. Let's assume that you have a single file in the current directory called mymusic.mp3. The following will convert it into a 16-bit 44khz WAV file:
> lame --decode mymusic.mp3 mymusic.WAV
Next you have to convert it from a 44khz (the standard for CDs) to 8khz (the standard for phones). We'll use Sox for this:
> sox -V mymusic.WAV -r 8000 -c 1 -w mymusic.wav
You can now move the converted file mymusic.wav to /var/lib/asterisk/moh
You may need to remove the other files that are there and restart asterisk in order to hear it played.
Create Additional Music Classes
You might want to play different music for different occasions. If you want to do this, then create a new directory inside moh, and put your additional raw files in there, and add lines to your musiconhold.conf like this:
                                        ;
                                        ; Music on Hold -- Sample Configuration
                                        ;

                                        [default]
                                        mode=files
                                        directory=/var/lib/asterisk/moh

                                        [myclass]
                                        mode=files
                                        directory=/var/lib/asterisk/moh/mydirectory
Once you've defined your classes, you can test them by changing the entry for extension 2000 in /etc/asterisk/extensions.conf:
                                        exten => 2000,1,Answer
                                        ;Play my new music class, instead of the default.
                                        exten => 2000,2,SetMusicOnHold(myclass)
                                        exten => 2000,3,WaitMusicOnHold(20)
                                        exten => 2000,4,Hangup
Note: Remember to restart Asterisk if you've made any changes to your music on hold system.
Create Queues
Now you've defined your Agents and their phones, you're ready to set up a queue.
Queue definitions are found in /etc/asterisk/queues.conf. As you'll see there are a lot of configuration options; here are two example queues to get you started.
                                [Sales]
                                music=default
                                strategy=ringall
                                eventwhencalled=yes
                                timeout=15
                                retry=1
                                wrapuptime=0
                                maxlen = 0
                                announce-frequency = 0
                                announce-holdtime = no

                                [CustServ]
                                music=default
                                eventwhencalled=yes
                                strategy=ringall
                                timeout=15
                                retry=1
                                wrapuptime=0
                                maxlen = 0
                                announce-frequency = 0
                                announce-holdtime = no
These queues will ring all assigned Agents when a new Caller arrives, and will not make any announcements regarding queue size, estimated wait etc.
If you've defined a custom music class, you can set your queue to use it with the music parameter.
Do an Asterisk reload, and the new queues will appear in the Control Panel within 10 seconds:
New queues appear automatically in OrderlyStats
After answer, John is shown as Talking to Caller 1003.
It is possible to assign static Agents to your queues in queues.conf with a member line like this:
member => SIP/1001 ;Adds John Smith to queue
However, this is not a good idea as static Agents cannot then be logged in and out of queues dynamically - they are permanently assigned instead. This means that static Agents have the following drawbacks:
-
Static Agents cannot log in and out when they arrive for work and leave for home,
-
Static Agents' session times cannot be tracked,
-
Callers cannot be automatically routed away from the queue if no-one's there to answer them,
-
Static Agents cannot be dynamically reassigned to different queues, and
-
Static Agents' phones are rung all the time, regardless of whether the Agent is present to answer, so you will have a room full of ringing phones all the time.
These drawbacks are removed by using dynamic Agents instead as described in the next section.
Hint: You can use Group functionality to assign groups of Agents to queues, but many of our users have had problems with this system, so we don't recommend it. It's much better to add Agents individually to each queue.
Hint: If you have already set up your Asterisk queues, you should remove any 'member =>' lines from your queues.conf, otherwise your agents won't be able to dynamically log in and out of your queues. You can manage agent assignment in the OrderlyStats Agents page.
Queue Log In and Log Out
To recap, so far we have defined our Agents and the phones they use.
We have also defined two queues, so the last thing we need to do is create the mechanism that allows Agents to log in and out of the queues, so they can start receiving queued calls.
The Hard Way
Skip to The Easy Way if you're using OrderlyStats.
If you're not using OrderlyStats, you can provide your Agents with numbers to dial to log in and out of individual queues, but you must then give your queues numeric names. Here is an example:
                                [macro-queue-login]
                                exten => s,1,Set(agent=${ARG1})
                                exten => s,n,Set(queue=${ARG2})
                                exten => s,n,NoOp(Queue login agent ${agent} to queue ${phone});
                                exten => s,n,AddQueueMember(${queue},SIP/${agent});
                                exten => s,n,Playback(agent-loginok)

                                [macro-queue-logout]
                                exten => s,1,Set(agent=${ARG1})
                                exten => s,n,Set(queue=${ARG2})
                                exten => s,n,NoOp(Queue logout agent ${agent} from queue ${phone});
                                exten => s,n,RemoveQueueMember(${queue},SIP/${agent});
                                exten => s,n,Playback(agent-loggedoff)


                                [main]
                                ;...

                                exten => _3XXX1,1,Answer
                                exten => _3XXX1,n,Read(Agent,Agent-user)
                                exten => _3XXX1,n,Macro(queue-login,${Agent},${EXTEN:0:4})
                                exten => _3XXX1,n,Hangup

                                exten => _3XXX11,1,Answer
                                exten => _3XXX11,n,Read(Agent,Agent-user)
                                exten => _3XXX11,n,Macro(queue-logout,${Agent},${EXTEN:0:4})
                                exten => _3XXX11,n,Hangup
This has the following limitations:
-
All your queue names must be four digits long and start with the number 3 (which is not user-friendly), and
-
The Call Center Manager cannot manage which Agent is assigned to each queue, and,
-
Agents who are members of multiple queues will have to log in and log out of each one separately, and
-
Agents may not be able to perform login or logout if their phone is already ringing or in use, and
-
There is no support for Agent prioritisation (using the Penalty system), and
-
There is no support for wrap-up (using the Pause system).
The Easy Way
The easy way to do queue login and logout is with OrderlyStats. OrderlyStats comes with an Agent Toolbar that your Agents use to log in and out of their queues. The first step is to assign the Agents to the queues, using the Agents page - click on the 'None' link at the end of each Agent's row to open the assigner dialog, like this:
If you're not using OrderlyStats, you can provide your Agents with numbers to dial to log in and out of individual queues, but you must then give your queues numeric names. Here is an example:
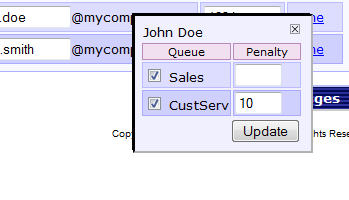
Adding John to Sales and CustServ
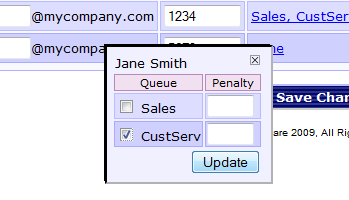
Adding Jane to CustServ
Although the Agents are now assigned, they won't start taking calls until you log them in with the Login button (Login Button), which you can do from this page as Call Center Manager.
Agent Toolbar
For your Agents to log themselves in and out of your queues, they need the Agent Toolbar. You should have already set them up with a username and password for this in the 'Add Phones to OrderlyStats' section above. Once logged in, the toolbar looks like this:

Jane's Agent Toolbar showing an answered INBOUND call.
To Log Out of all her queues, Jane just needs to hit the Log Out button. She can log in to all her assigned queues with one touch by hitting the Log In button.
If your Agents need time to wrap up after each call before taking the next call, they can do this by hitting the Pause button during the call, or aftwerwards. This will prevent the queue(s) to which they are assigned from sending them more calls until they hit the Resume button.
The OrderlyStats Reports will show you Agent session times, and also time spent in wrap up after each call.
Note: The Toolbar Login/Logout function logs an Agent in or out of all the queues to which the Agent is assigned in the Agents page.
Agents do not have direct control over which queues they are assigned to with the Agent Toolbar. This is by design.
As Call Center Manager, you can do this yourself at any time using the Agents page to reassign Agents on the fly, or log them in and out yourself using the Log In/Log Out buttons next to each Agent in the Control Panel. You retain full control of which queue(s) each Agent is assigned to.
Hint: Some versions of Asterisk contain a bug that prevents agents from initialising correctly when Asterisk is restarted. You can check to see if your version of Asterisk is affected by restarting Asterisk, and then running queue show or show queues from the command line. If your agents are shown as Invalid, then you can easily fix this by adding the following lines to the preload section of your /etc/asterisk/modules.conf file:
                                preload => pbx_config.so
                                preload => chan_local.so
                                preload => chan_sip.so
Test Your Queue
The last step is to provide an extension for incoming Callers to ring into the queue. Add the following lines to /etc/asterisk/extensions.conf at the end of the [main] context.
                                exten => 3001,1,Answer
                                exten => 3001,n,Ringing
                                exten => 3001,n,Wait(2)
                                exten => 3001,n,Set(_doVoicemail=no)
                                exten => 3001,n,Queue(CustServ,twh)
                                exten => 3001,n,Hangup

                                exten => 3002,1,Answer
                                exten => 3002,n,Ringing
                                exten => 3002,n,Wait(2)
                                exten => 3002,n,Set(_doVoicemail=no)
                                exten => 3002,n,Queue(Sales,twh)
                                exten => 3002,n,Hangup
Next do an Asterisk reload.
To test your queue, use SJPhone (1003) to dial extension 3001 (CustServ).
You should hear music on hold through SJPhone, and the other phones will start ringing.
You will see something like this in the Control Panel:
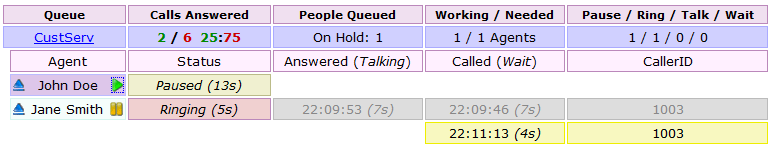
A queued call in the CustServ queue. Jane's phone is ringing, but John is currently Paused, so no calls are placed to him.
Note that if there are no Agents available, the Caller will hear music on hold indefinitely.
Hint: If you want to change this behaviour, then add leavewhenempty=yes to the queue's entry in queues.conf, and replace the Hangup line in the above example with, for instance, a call to leave Voicemail instead. As of Asterisk 1.2.0, this is the default behaviour.
Get OrderlyQ
Steps 1-7 will give you a call centre with a traditional ACD / on hold queue system.
However, the traditional ACD as implemented in Asterisk is not optimised, so you will not be answering as many callers as you should when using an optimised queue.
To answer all your callers, you will need our OrderlyQ add on, which guarantees you a > 99% answer rate, and at least a 300% return on investment.
The OrderlyQ system also means that your callers will not have to wait on hold in order to get through, so you will see massive increases in caller satisfaction, as well as a major improvement to your business bottom line.
To get started with OrderlyQ, just request a demo and we'll tell you all about it.
Check out our other tutorials by clicking here